Свечи зажигания не откручиваются: Как выкрутить свечи зажигания если прикипели
Как выкрутить свечи зажигания если прикипели
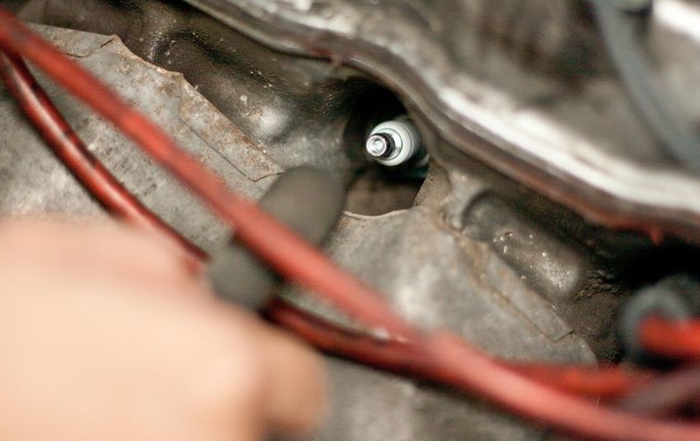
Прикипевшую свечу зажигания можно открутить «малой кровью» — без демонтажа головки. Другой вариант — снимать головку и высверливать свечу.

Использованная cвеча зажигания, японский производитель FR5A
Первым делом попробуйте — сорвать свечу на холодном двигателе! (и только на холодном). При помощи удлинённой головки и длинного воротка.
Постарайтесь сделать рычаг воротка как можно длиннее — это упростит процесс.
Не делай резких движений, поскольку свеча может просто сломаться — плавно увеличивайте давление на плечо.

Фото как откручивается прикипевшая свеча
Перед откручиванием можно (и нужно) обработать свечу проникающей смазкой — WD-40.
В случае отсутствия таковой, можно использовать — обычный керосин.
Также не помешает сделать несколько ударов (несильных) по головке-удлинителю или ключу — обстучать!.

Описание проникающей смазки WD-40
Если же свеча зажигания не откручивается через неправильную длину резьбовой части (поскольку часть её находящаяся в камере сгорания покрывается нагаром), то демонтаж обычным способом становится невозможным!
Поможет только снятие головки.
При — «мёртвом закипании» свечи придётся не только снимать головку блока цилиндров, но и высверливать её.
Вы отделаетесь лёгким испугом если после высверливания сохранится резьба в головке.
Как правило — высверливается отверстие большего диаметра, в него вставляется — втулка-переходник, в которой и нарезается новая резьба под свечу.
Этой инструкцией воспользовались: 36815 раз.
Как выкрутить «прикипевшую» свечу зажигания

В большинстве случаев плановая или аварийная замена свечей зажигания (СЗ) не доставляет проблем. Несколько поворотов специального ключа – и отработавшая свое деталь в руках. Однако порой возникают ситуации, когда выкрутить свечу зажигания проблематично. Она прикипает намертво и не поддается усилиям. В таких случаях не стоит паниковать и делать «резких движений», могущих усугубить ситуацию. Существуют методики, как раз и предназначенные для того, чтобы «малой кровью» выкрутить «застрявшие» свечи зажигания.
Почему заклинивают СЗ
Правильно вкрученная свеча на нормально работающем двигателе прикипать попросту не может. Большинство проблем с извлечением – следствие некорректной эксплуатации. Среди основных причин затрудненного хода СЗ называют:
- несвоевременную замену, вследствие которой СЗ прикипела под действием длительных механических и тепловых нагрузок;
- некачественный материал, из которого выполнена свеча;
- чрезмерное усилие закручивание;
- установка СЗ на горячий двигатель;
- инородные частицы на резьбовом соединении (перед закручиванием колодец не был вычищен).
Что делать?
Все работы по замене СЗ должны вестись только на холодном двигателе: без уменьшения резьбового отверстия вследствие расширения.
В рабочую зону прикипевшей СЗ заливается WD-40. Нескольких часов «откисания» обычно достаточно, чтобы убрать скопившуюся накипь. Затем свеча слегка обстукивается и предпринимается попытка выкрутить. Часто для усиления вращающего момента используют дополнительное плечо – вороток.
Если указанные методы не принесли успеха, лучше не испытывать судьбу и довериться профессиональным ремонтникам.
Как выкрутить разрушенную СЗ
Нередки ситуации, когда безуспешные попытки выкрутить СЗ оканчиваются плачевно – обломом ее части. Впрочем, даже такое развитие ситуации – еще не трагедия. Вполне реально выкрутить и сломанную СЗ. Для этого в магазине приобретается специальный ключ – экстрактор.
Вооружившись необходимым инструментом, приступают к выкручиванию:
- очищают место работ и заливают его WD -40;
- вкручивают экстрактор в обломок;
- крепят экстрактор к динамометрическому ключу и пробуют аккуратно выкручивать СЗ;
- скрип и треск – нормальное явление, сигнализирующее о том, что свеча «пошла»;
- поворачивать нужно неспешно, без резких движений и чрезмерных усилий, чтобы не сорвать резьбу;
- после извлечения очистить свечной колодец от мусора и проверить целостность резьбы.
Данная операция – достаточно рискованная из-за большой вероятности повреждения резьбы. Ее срыв чреват дальнейшей заменой головки блока цилиндров или переточкой ее под специальный вкладыш-переходник. Однако, поскольку с обломанной СЗ дальнейшая эксплуатация авто невозможна, даже такой риск становится оправданным.
Приобретайте новые запчасти вовремя и не забывайте контролировать исправность своего авто!
Как выкрутить свечи зажигания, если они прикипели
Процедура замены свеч в авто, зачастую не доставляет каких-либо сложностей и проблем водителям транспортных средств, так как в большей части подобных ситуаций процедура выполняется либо планово, либо при аварии. Когда данная деталь становится непригодной, ее заменяют с помощью специализированного ключа. Все же смена свечей зажигания может доставить некоторые неудобства владельцу автомобиля. Это происходит, потому что она пригорает и выкрутить ее даже с применением силы не так-то просто. Если не откручивается свеча зажигания: что делать?
В данной ситуации не следует придаваться панике, все что нужно — это удержаться от резких движений. В этом случае можно еще больше ухудшить ситуацию. Однако на сегодняшний день существует несколько способов более безопасного извлечения свечей зажигания, которые застряли. Поэтому у многих водителей возникает вопрос, почему не откручивается свеча зажигания: что делать в этом случае? Стоит отметить, что эти запчасти, которые прикручены правильно в исправном и хорошо работающем двигателе могут пригорать не просто так, на это должны быть причины. Однако когда эта деталь все же прикипает, это может означать, что использование транспортного средства было некорректным. Именно по этой причине и появляются проблемы с извлечением свечей.
Что делать если не выкручиваются свечи зажигания и какие методы использовать, чтобы такого не произошло
Чаще всего подобные ситуации происходят, потому что владелец может не совсем корректно эксплуатировать транспортное средство или оказывать ненадлежащий уход. К числу причин, по которым возникает затруднение с заменой свечей относят следующие:
- вследствие долговременных нагрузок возникают неизбежные проблемы с извлечением этих деталей, так как замена произведена не вовремя;
- материал, из которого сделана сама деталь, может оказаться низкокачественным и очень быстро придет в негодность.
- слишком сильное давление во время закручивания запчасти, которое может повлечь за собой порчу детали;
- грязное соединение в резьбе. Посторонние частицы, которые затрудняют дальнейшую замену данной запчасти.
Важно помнить, что ремонтные работы нужно производить на охлажденном двигателе, это является обязательным условием для безопасного устранения неполадок. Далее будут представлены способы в которых описывается что делать если не выкручивается свеча зажигания. В область, где будут проводиться ремонтные работы, заливают специальный раствор и оставляют на несколько часов. Это делается для того, чтобы размягчить область прикипевшей детали. Обычно, перед тем как выкрутить свечи зажигания, если они пригорели, их стоит очистить и только тогда можно приступать к следующему шагу.
После того, как этот промежуток времени прошел, прикипевшую деталь немного обстукивают, для этого не нужно прикладывать много сил. Затем делается попытка ее извлечения, в этом случае довольно часто используют вспомогательное плече, которое называется вороток. Если даже после этого вы не можете открутить данную деталь, и вы не знаете,что делать если не выкручивается свеча зажигания, то в такой ситуации стоит обратиться за помощью в сервисный центр, где вам могут помочь в этом вопросе.
 Как открутить свечу зажигания
Куда обратиться, если прикипели свечи зажигания, и как их вывернуть
Происходят ситуации, когда самостоятельное извлечение данной запчасти оборачивается довольно печально. Как правило, такие случаи сопровождаются деформацией или поломкой резьбового отверстия или разрушением на части самой свечи. Однако поломка самой детали не так плачевна, ведь ее даже в таком состоянии возможно извлечь. Все что для этого необходимо это приобрести в магазине специальный ключ под названием экстрактор. С его помощью, можно изъять остатки свечи, однако эта процедура может быть достаточно рискованной, потому как таким образом можно повредить резьбовое отверстие. Последствиями этой процедуры может обойтись дальнейшей сменой головки блока цилиндров или же преобразование ее для специального переходника.
Однако с дефектом свечей зажигания использование автомобиля становится невозможным. Все же стоит заметить, что если вы сами не справитесь с этой задачей, то лучше обратиться за помощью в сервисный центр. Поэтому многие водители передвижных средств обращаются в сервисы с утверждением: «не могу открутить свечу зажигания, что делать?». Подобные обращения довольно часто встречаются и опытные, умелые мастера могут помочь в разрешении этого вопроса. Не многие ремонтные центры транспортных средств могут сделать работу качественно и аккуратно, как того требует клиент.
Далеко не все из них могут исправить поломку должным образом. И в конечном итоге придется доплачивать, чтобы исправить работу непрофессиональных работников сервиса. Поэтому стоит обращаться к профессионалам, которые знают, что делать в таком случае и могут правильно и без повреждений резьбы изъять непригодные для дальнейшей работы прикипевшие свечи. В этом случае вопросы о том, что я не могу выкрутить свечу зажигания, решаются немного быстрее и качественнее. Однако профессионалы работают только в хороших сервисных центрах, которые занимаются ремонтом и устранением неполадок, связанных с транспортными средствами. Поэтому не рискуйте сами исправлять неполадки, если предпринятые вами попытки не сработали.
Ответственно подойдите к решению данного вопроса, и ситуация не будет иметь сложностей.
Сообщества › Toyota Club › Блог › Как выкрутить прикипевшую свечу? И стоит ли вообще ее выкручивать?
Всем доброго времени суток.
Недавно столкнулся с проблемой выкручивания одной свечки. Сломал один свечной ключ, а свечу так и не выкрутил.
Подробности тут: www.drive2.ru/cars/toyota…h-88/journal/836399/#post
Подскажите, пожалуйста, стоит ли ее вообще выкручивать? Может быть ездить так, не меняя ее?
Или лучше, все таки, попытаться ее достать?
ОБНОВЛЕНИЕ: 16.04.2013
УРА! Выкрутилась без проблем. Сначала4 ночи заливал свечу WD-хой, потом какое-то время просто так поездил, а 3 дня назад, когда менял масло, она просто выкрутилась, как обычно (с небольшим усилием) и все!
Метки: замена свечей, fielder, не выкручивается свеча
Комментарии 21
ни в коем случае нельзя проблемные (как эта) свечи выкручивать на горячую из алюминиевых головок. Это проканывало в старину на чугунных головах, из алюминия либо вместе с нарезанной резьбой вывернешь (новая свеча держаться не будет), либо отломишь резьбовую часть свечи (снимать головку придеться). Вариант один- постепенно отмачивать. Прикупи большой флакон ВДешки, и каждый раз сразу после поездки заливай колодец по максимуму. Сразу не пытайся крутить. Следующая поездка- если остановка часа на 2-3, то заливай опять. Раза после 4-5 попытайся стронуть свечу с места. Если пошла- не крути сразу силком. Залей опять ВДешки и туда-сюда, постепенно выворачивай. Не бойся что ВДешка попадет в цилиндр, сгорит без проблем при первом же запуске мотора.
спасибо за исчерпывающую информацию. А что вы думаете об упомянутых инструментах для выкручивания обломанных свечей/болтов и гаек?
forum.amadeus-project.com…sion/index.php/t4108.html
есть и такие и другого типа и производителя. Толку от них мало. Если резьба не сильно зажата- то она не оторвется от детали, а если серьезный случай, типа твоего- они не помогут, просто отломится сам экстрактор. Проверено много раз на себе. Они нужны иногда бывают в более простых случаях…
Блин, что-то все не так радужно прорисовывается (((
глаза боятся, а руки делают…
ни в коем случае нельзя проблемные (как эта) свечи выкручивать на горячую из алюминиевых головок. Это проканывало в старину на чугунных головах, из алюминия либо вместе с нарезанной резьбой вывернешь (новая свеча держаться не будет), либо отломишь резьбовую часть свечи (снимать головку придеться). Вариант один- постепенно отмачивать. Прикупи большой флакон ВДешки, и каждый раз сразу после поездки заливай колодец по максимуму. Сразу не пытайся крутить. Следующая поездка- если остановка часа на 2-3, то заливай опять. Раза после 4-5 попытайся стронуть свечу с места. Если пошла- не крути сразу силком. Залей опять ВДешки и туда-сюда, постепенно выворачивай. Не бойся что ВДешка попадет в цилиндр, сгорит без проблем при первом же запуске мотора.
WD-шка рулит! Думаю, что именно она мне помогла. Выкрутил без проблем и без особых усилий после того, как сначала 4 ночи заливал вэдэхой, а потом пару недель поездил в обычном режиме
рад за тебя)))) удачи.
Лучше правда подготовься — купи набор экстракторов, не в этот, так в другой раз пригодятся)
Зацени forum.amadeus-project.com…sion/index.php/t4108.html
вот спасибо! Очень полезная информация. Надо присмотреться к такому наборчику)))
Вот только автор пишет, что на горячую наоборот лучше не крутить, а все тут советуют попытаться. Вот и не знаю опять, как лучше поступить
Лучше правда подготовься — купи набор экстракторов, не в этот, так в другой раз пригодятся)
Зацени forum.amadeus-project.com…sion/index.php/t4108.html
купил набор, но он, слава богу, не понадобился )))
Тоже была такая проблема не выкручивалась… сделал побольше рычаг в итоге резьба от свечки осталась стоять на месте а всё остальное отламалось поехал к спецам сказали либо мотор разбирать либо придумывай специнструмент и ковыряй пока не выкрутишь… так что сила есть ума не надо совсем ни для этой ситуации
+1 не стоит силу применять сильную, залей раскоксовыватель, или керосин, оставь на сутки, после пробуй выкрутить…
Тоже была такая проблема не выкручивалась… сделал побольше рычаг в итоге резьба от свечки осталась стоять на месте а всё остальное отламалось поехал к спецам сказали либо мотор разбирать либо придумывай специнструмент и ковыряй пока не выкрутишь… так что сила есть ума не надо совсем ни для этой ситуации
Для таких ситуаций продаются экстракторы.
Либо по старинке — забиваешь треугольный напильник и выкручиваешь то, что осталось от резьбы.
Тоже была такая проблема не выкручивалась… сделал побольше рычаг в итоге резьба от свечки осталась стоять на месте а всё остальное отламалось поехал к спецам сказали либо мотор разбирать либо придумывай специнструмент и ковыряй пока не выкрутишь… так что сила есть ума не надо совсем ни для этой ситуации
была такая-же ситуация
У меня на Мазде тоже были прикипевшие, причём все)
И тоже я сломал 2 свечника — которые с шарниром. Затем взял головку из комплекта инструмента, затем нашёл трубку подлиннее — она использовалась в качестве рычага.
Откручивал с «рывка».
Жаль только, что поставленные мною иридиевые свечи по 590р за штуку выдержали чуть более 20.000км на нашем бензине(
мда…супер. Попробую на горячую выкрутить головкой с трубой
На горячую и плавно, без рывков! Лучше рычаг побольше. Не раз слышал про обломанные свечи. Ладно тут прикипела, но некоторые очень часто при мне начинают пыхтя затягивать эти свечи, а про гайки колесные вообще молчу — могут даже ногами начать)…
а зачем это все надо? Зачем с таким усилием затягивать? Самим ведь потом выкручивать придется. Попробую на горячую
мда…супер. Попробую на горячую выкрутить головкой с трубой
выкрутишь вместе с резьбой, удачи!
как ты мог сломать ключ, или он у тебя двухколенный? Бери ключ трубку, в дыру толкай что нить мощное, а на нее трубу для увеличения рычага, и выкручивай, полюбой пойдет! А свечку менять в обяз!
да, именно, еще с шарниром и, походу, китайский. Сломался от усилия побольше.
Пробовал выкручивать батиным ключом-трубой — гнется рукоятка, которая вставляется в дырку этой самой трубы
Совет 1: Как открутить свечи зажигания

- Как открутить свечи зажигания
- Как поменять свечи на «Октавии»
- Как заменить свечи на Lada Priora
Совет 2: Как выкрутить свечу

- Торцевой ключ на «10», свечной ключ
При откручивании свечи на прогретом двигателе не разрешается браться за керамическую часть свечи, так как это может привести к появлению в ней микротрещин, что сделает свечу непригодной к дальнейшему использованию.
В случае необходимости прочистки свечи запрещается использование абразивных материалов, т.к. это может привести к уменьшению зазора между контактами свечи.
Совет 3: Как почистить свечи зажигания

- Для чистки свечей необходим свечной ключ, чистый керосин и старая ненужная зубная щетка.
Совет 4: Как заменить свечи зажигания на Skoda Octavia

- Специальная головка для свечей на 16, имеющая резиновую шайбу для фиксации свечи внутри головки, а также удлинитель (не менее 15 см длиной) с воротком; шестигранник на 5; плоская отвертка; крупная отвертка под крест.
Это делается на SkodaOctavia следующим образом:
Снимите пластиковую облицовку двигателя, отсоединив четыре защелки ее крепления крестообразной отверткой. Для этого поверните их на 90 градусов в любую сторону. Найдите под облицовкой четыре массивных корпуса (пластиковых) катушек зажигания. На этой модели двигателя на каждую свечу зажигания приходится своя катушка, каждая из которых крепится двумя болтами с головкой под шестигранник.
Внимание! Крышку снимайте вертикально вверх, не переворачивая, чтобы избежать утери одной из защелок.
Установите с помощью той же головки новые свечи, для чего вставьте в головку новую свечу с небольшим усилием (удерживая свечу за резьбовую часть). Свеча должна войти в резиновую шайбу и зафиксироваться в ней. Шайба не дает свече выпасть из головки при установке в колодец. Заворачивайте свечу, вращая головку вручную через удлинитель. Вворачивание свечи должно происходить без усилий, чтобы не повредить резьбу в корпусе головки блока цилиндров. Дотяните свечу окончательно, используя вороток для затяжки. Усилие затяжки свечи указано в Руководстве по ремонту, а также на упаковке свечи зажигания.
Произведите окончательную сборку, выполняя действия в обратной последовательности. Убедитесь, что катушки зажигания «сели» на свечи перед фиксацией их болтами.
«
Отличная статья 0
что делать в этой ситуации
- Что делать если не выкручиваются свечи зажигания и какие методы использовать, чтобы такого не произошло
- Куда обратиться, если прикипели свечи зажигания, и как их вывернуть
Процедура замены свеч в авто, зачастую не доставляет каких-либо сложностей и проблем водителям транспортных средств, так как в большей части подобных ситуаций процедура выполняется либо планово, либо при аварии. Когда данная деталь становится непригодной, ее заменяют с помощью специализированного ключа. Все же смена свечей зажигания может доставить некоторые неудобства владельцу автомобиля. Это происходит, потому что она пригорает и выкрутить ее даже с применением силы не так-то просто. Если не откручивается свеча зажигания: что делать?
В данной ситуации не следует придаваться панике, все что нужно — это удержаться от резких движений. В этом случае можно еще больше ухудшить ситуацию. Однако на сегодняшний день существует несколько способов более безопасного извлечения свечей зажигания, которые застряли. Поэтому у многих водителей возникает вопрос, почему не откручивается свеча зажигания: что делать в этом случае? Стоит отметить, что эти запчасти, которые прикручены правильно в исправном и хорошо работающем двигателе могут пригорать не просто так, на это должны быть причины. Однако когда эта деталь все же прикипает, это может означать, что использование транспортного средства было некорректным. Именно по этой причине и появляются проблемы с извлечением свечей.
 Свечи зажигания
Что делать если не выкручиваются свечи зажигания и какие методы использовать, чтобы такого не произошло
Чаще всего подобные ситуации происходят, потому что владелец может не совсем корректно эксплуатировать транспортное средство или оказывать ненадлежащий уход. К числу причин, по которым возникает затруднение с заменой свечей относят следующие:
- вследствие долговременных нагрузок возникают неизбежные проблемы с извлечением этих деталей, так как замена произведена не вовремя;
- материал, из которого сделана сама деталь, может оказаться низкокачественным и очень быстро придет в негодность.
- слишком сильное давление во время закручивания запчасти, которое может повлечь за собой порчу детали;
- грязное соединение в резьбе. Посторонние частицы, которые затрудняют дальнейшую замену данной запчасти.
Важно помнить, что ремонтные работы нужно производить на охлажденном двигателе, это является обязательным условием для безопасного устранения неполадок. Далее будут представлены способы в которых описывается что делать если не выкручивается свеча зажигания. В область, где будут проводиться ремонтные работы, заливают специальный раствор и оставляют на несколько часов. Это делается для того, чтобы размягчить область прикипевшей детали. Обычно, перед тем как выкрутить свечи зажигания, если они пригорели, их стоит очистить и только тогда можно приступать к следующему шагу.
После того, как этот промежуток времени прошел, прикипевшую деталь немного обстукивают, для этого не нужно прикладывать много сил. Затем делается попытка ее извлечения, в этом случае довольно часто используют вспомогательное плече, которое называется вороток. Если даже после этого вы не можете открутить данную деталь, и вы не знаете,что делать если не выкручивается свеча зажигания, то в такой ситуации стоит обратиться за помощью в сервисный центр, где вам могут помочь в этом вопросе.
 Как открутить свечу зажигания
Куда обратиться, если прикипели свечи зажигания, и как их вывернуть
Происходят ситуации, когда самостоятельное извлечение данной запчасти оборачивается довольно печально. Как правило, такие случаи сопровождаются деформацией или поломкой резьбового отверстия или разрушением на части самой свечи. Однако поломка самой детали не так плачевна, ведь ее даже в таком состоянии возможно извлечь. Все что для этого необходимо это приобрести в магазине специальный ключ под названием экстрактор. С его помощью, можно изъять остатки свечи, однако эта процедура может быть достаточно рискованной, потому как таким образом можно повредить резьбовое отверстие. Последствиями этой процедуры может обойтись дальнейшей сменой головки блока цилиндров или же преобразование ее для специального переходника.
Однако с дефектом свечей зажигания использование автомобиля становится невозможным. Все же стоит заметить, что если вы сами не справитесь с этой задачей, то лучше обратиться за помощью в сервисный центр. Поэтому многие водители передвижных средств обращаются в сервисы с утверждением: «не могу открутить свечу зажигания, что делать?». Подобные обращения довольно часто встречаются и опытные, умелые мастера могут помочь в разрешении этого вопроса. Не многие ремонтные центры транспортных средств могут сделать работу качественно и аккуратно, как того требует клиент.
Далеко не все из них могут исправить поломку должным образом. И в конечном итоге придется доплачивать, чтобы исправить работу непрофессиональных работников сервиса. Поэтому стоит обращаться к профессионалам, которые знают, что делать в таком случае и могут правильно и без повреждений резьбы изъять непригодные для дальнейшей работы прикипевшие свечи. В этом случае вопросы о том, что я не могу выкрутить свечу зажигания, решаются немного быстрее и качественнее. Однако профессионалы работают только в хороших сервисных центрах, которые занимаются ремонтом и устранением неполадок, связанных с транспортными средствами. Поэтому не рискуйте сами исправлять неполадки, если предпринятые вами попытки не сработали.
Ответственно подойдите к решению данного вопроса, и ситуация не будет иметь сложностей.
Вконтакте
Google+
Свечи зажигания необходимы для образования искры в камере сгорания, с помощью которой происходит воспламенение топливной жидкости. От них зависит запуск двигателя, его бесперебойная работа, расход топлива и др. Поэтому надо постоянно следить за чистотой и целостностью свеч.Свечи надо чистить их от нагара и копоти. Если свеча сломалась, ее необходимо заменить на новую, так как автомобиль с такой неисправностью эксплуатировать нельзя. Как выкрутить сломанную свечу зажигания, я расскажу в этой статье.
Срок эксплуатации воспламенителей во многом зависит от качества бензина и правильного ухода за ними. Если нагревательные элементы регулярно чистить, это увеличит срок их годности, так как нагар способствует утечке высокого напряжения, что снижает мощность искры или даже препятствует ее появлению. Правда, если они перегреваются, может возникнуть неконтролируемое капельное зажигание. Это возможно на больших скоростях, что влечет за собой детонацию или могут сломаться детали двигателя автомобиля. Обычно через 30-40 тысяч километров свечи надо менять. При замене ее можно случайно сломать, так как она могла прикипеть. Если с вами произошла такая неприятность, то не надо пугаться. Следуя простой инструкции по выкручиванию сломанной свечи, вы легко с этим справитесь.
Прежде чем начать выкручивать воспламенители, необходимо подготовиться. Во-первых, надо подождать, пока полностью остынет двигатель. Алюминиевая головка цилиндров в нагретом состоянии расширяется и зажимает в резьбе свечи зажигания, поэтому выкрутить их невозможно. Кроме того, холодный агрегат обезопасит вас от ожогов.
Для процедуры выкручивания необходимо приготовить следующие инструменты и материалы:
- специальный шестигранник;
- компрессор;
- масло WD -40.
После того как двигатель остынет, надо отсоединить все контакты. С помощью специальных средств и чистой тряпки, надо тщательно очистить от грязи место нахождения нагревательных элементов, чтобы ничего не упало в свечной колодец.
Компрессором с тонкой трубкой или другим прибором, нагнетающим воздух, надо продуть сам колодец. Это надо делать очень тщательно, так как обычно в гнезде много мусора и грязи. После продувки в гнездо надо залить масло WD -40. Оно смажет резьбу и облегчит выкручивание. Приступать к работам можно спустя 10-15 минут после того, как будет залито масло.
Инструкция по выкручиванию
Для выкручивания можно воспользоваться специальным шестигранником или динамометрическим ключом.
С помощью динамометрического ключа контролируется усилие при выкручивании, тем самым, предотвращается срыв резьбы. Простой ключ для выкручивания воспламенителя не подойдет, так как он не войдет в колодец, кроме того, вы можете сорвать резьбу или сломаться.
Каждый нагревательный элемент имеет шестигранник под динамометрический ключ, который расположен примерно на середине свечи. Благодаря ему проводится выкручивание. Обычно отламывается изолятор – верхняя часть свечи. Ключ накидываем на оставшуюся в гнезде часть детали. После этого следует плавными движениями не спеша начать выкручивать деталь. При этом надо воротник, головку и удлинитель удерживать строго параллельно оси устройства. Свеча зажигания имеет правую резьбу, поэтому она должна выкручиваться против часовой стрелки. Движения должны быть без применения больших усилий, чтобы не сорвать резьбу, иначе вам придется ехать в сервисный центр, так как сами вы уже не сможете выкрутить сломанную деталь.
При повороте ключа следует прислушиваться к звукам. Если слышится скрежет, то деталь выкручивается как положено. Если вы почувствовали рывок и выкручивание стало проходить легче, это может означать, что сорвана резьба. В этом случае рекомендую повернуть ключ назад, и немного подождать, пока остынет резьба. Затем плавными движениями в разные стороны выкрутить отломанную деталь.
(СЗ) представляют собой расходный материа, предназначение которого заключается в передаче искры на цилиндры мотора для воспламенения горючей смеси. Поломка СЗ приведет к тому, что нормальная эксплуатация мотора будет невозможной. В этой статье мы расскажем о том, как использовать ввертыш для ремонта и как можно выкрутить СЗ.
Возможные трудности при выкручивании
Перед тем, как выкрутить и снять свечи зажигания, нужно разобраться в некоторых трудных моментах, которые могут случиться при откручивании.
Иногда автовладельцы, которые решают выкручивать и снимать свечи, сталкиваются с проблемами демонтажа, которые могут быть обусловлены различными причинами, в частности:
- Свечу зажигания перекосило. Если автовладелец использовал ключ для свечей зажигания, размер конструкции которого не позволяет обеспечить оптимальную фиксацию СЗ, то это вполне могло произойти.
- Часто причиной является резьба, а именно — ее загрязнение. Для недопущения такой проблему свечу перед установкой в резьбе нужно прочистить или продуть.
- Не так часто, но все же случаются ситуации, когда свеча затягивается с большим усилием, чем необходимо.
Инструкция по выкручиванию
Динамометрический ключ — для демонтажа СЗ
Итак, если вы решили открутить свечу или произвести восстановление резьбового элемента, то вам поможет инструкция по демонтажу СЗ.
Как выкрутить свечу, чтобы не допустить ошибок, и что делать с открученной СЗ:
- Демонтаж устройство с сорванной резьбой начинается со снятия высоковольтного кабеля и отключения контактов. Не нужно торопиться, необходимо быть наиболее внимательным. После снятия производится очистка места установки СЗ при помощи компрессора, это позволит удалить весь мусор и остатки устройства. Поэтому процедура очистки резьбы может занять какое-то время.
- После этого вам потребуется взять специальный динамометрический ключ, с его помощью можно регулировать прикладную силу. Если свеча не рабочая и сломана, то другой инструмент использовать не получится, поскольку только этот ключ сможет войти в колодец СЗ. На прак
Не выкручивается свеча зажигания: что делать?
В большинстве случаев плановая или аварийная замена свечей зажигания (СЗ) не доставляет проблем. Несколько поворотов специального ключа – и отработавшая свое деталь в руках. Однако порой возникают ситуации, когда выкрутить свечу зажигания проблематично. Она прикипает намертво и не поддается усилиям. В таких случаях не стоит паниковать и делать «резких движений», могущих усугубить ситуацию. Существуют методики, как раз и предназначенные для того, чтобы «малой кровью» выкрутить «застрявшие» свечи зажигания.
Почему заклинивают СЗ
Правильно вкрученная свеча на нормально работающем двигателе прикипать попросту не может. Большинство проблем с извлечением – следствие некорректной эксплуатации. Среди основных причин затрудненного хода СЗ называют:
- несвоевременную замену, вследствие которой СЗ прикипела под действием длительных механических и тепловых нагрузок;
- некачественный материал, из которого выполнена свеча;
- чрезмерное усилие закручивание;
- установка СЗ на горячий двигатель;
- инородные частицы на резьбовом соединении (перед закручиванием колодец не был вычищен).
Что делать?
Все работы по замене СЗ должны вестись только на холодном двигателе: без уменьшения резьбового отверстия вследствие расширения.
В рабочую зону прикипевшей СЗ заливается WD-40. Нескольких часов «откисания» обычно достаточно, чтобы убрать скопившуюся накипь. Затем свеча слегка обстукивается и предпринимается попытка выкрутить. Часто для усиления вращающего момента используют дополнительное плечо – вороток.
Если указанные методы не принесли успеха, лучше не испытывать судьбу и довериться профессиональным ремонтникам.
Как выкрутить разрушенную СЗ
Нередки ситуации, когда безуспешные попытки выкрутить СЗ оканчиваются плачевно – обломом ее части. Впрочем, даже такое развитие ситуации – еще не трагедия. Вполне реально выкрутить и сломанную СЗ. Для этого в магазине приобретается специальный ключ – экстрактор.
Вооружившись необходимым инструментом, приступают к выкручиванию:
- очищают место работ и заливают его WD -40;
- вкручивают экстрактор в обломок;
- крепят экстрактор к динамометрическому ключу и пробуют аккуратно выкручивать СЗ;
- скрип и треск – нормальное явление, сигнализирующее о том, что свеча «пошла»;
- поворачивать нужно неспешно, без резких движений и чрезмерных усилий, чтобы не сорвать резьбу;
- после извлечения очистить свечной колодец от мусора и проверить целостность резьбы.
Данная операция – достаточно рискованная из-за большой вероятности повреждения резьбы. Ее срыв чреват дальнейшей заменой головки блока цилиндров или переточкой ее под специальный вкладыш-переходник. Однако, поскольку с обломанной СЗ дальнейшая эксплуатация авто невозможна, даже такой риск становится оправданным.
Приобретайте новые запчасти вовремя и не забывайте контролировать исправность своего авто!
90000 Symptoms of Bad or Failing Spark Plugs 90001 90002 Without a spark, there would be no way for fuel to ignite in the combustion chamber. Spark plugs have been a critical component of the internal combustion engine for years. Spark plugs are designed to transmit an electrical signal sent from the ignition coil at a predetermined time to create a spark that ignites the air-fuel mixture inside the combustion chamber. Each vehicle requires a particular type of spark plug made from specific materials and with a designated spark plug gap set by a mechanic during installation.Good spark plugs will burn fuel efficiently, while bad or failing spark plugs can cause the motor not to start at all. 90003 90002 Spark plugs are similar to motor oil, fuel filters, and air filters in that they require routine service and maintenance to keep your engine running strong. Most vehicles sold in the United States require their spark plugs to be replaced every 30,000 to 50,000 miles. However, some newer cars, trucks, and SUVs have advanced ignition systems that ostensibly make spark plug replacement unnecessary.Regardless of any warranties or claims made by a vehicle manufacturer, there remain situations where a spark plug wears out or shows signs of failing. 90003 90002 Listed below are 6 common symptoms of worn-out spark plugs or spark plugs that have fouled and need to be replaced by an ASE certified mechanic as soon as possible. 90003 90008 1. Slow acceleration 90009 90002 The most common cause of poor acceleration in most vehicles is a problem in the ignition system. Today’s modern engines have multiple sensors that tell the onboard computer and ignition system when to send electric pulses to fire the spark plug, so the issue may be with a faulty sensor.However, sometimes the issue is as simple as a worn-out spark plug. A spark plug is composed of materials that work together to produce a spark hot enough to ignite the air-fuel mixture. When those materials wear out, the effectiveness of the spark plug is reduced, which can significantly reduce the acceleration of the vehicle. 90003 90002 If you notice that your car is running sluggishly or does not accelerate as quickly as it used to, it may be attributed to a faulty spark plug that needs to be replaced.However, you should contact a mechanic to inspect this issue as it could be caused by multiple other factors including bad fuel filters, dirty or clogged fuel injector, or issues with oxygen sensors. 90003 90008 2. Poor Fuel Economy 90009 90002 A fully-functioning spark plug helps burn fuel efficiently in the combustion cycle. When this occurs, your car can achieve better-than-average fuel economy. When the plug is not working optimally, it is frequently because the gap between the spark plug electrodes is either too close or too far apart.In fact, many mechanics will take out spark plugs, examine them, and adjust the gap to factory settings as opposed to replacing the spark plug entirely. If your vehicle has an increase in fuel consumption, it very well could be attributed to a worn out spark plug. 90003 90008 3. Engine is Misfiring 90009 90002 If the engine misfires, it’s typically due to an issue in the ignition system. In modern cars, it’s usually due to a sensor malfunction. However, it may also be caused by a spark plug wire or the tip of the spark plug that connects to the wire being damaged.An engine misfire can be noticed by intermittent stumbling or sputtering sounds from the engine. If the engine is allowed to keep misfiring, exhaust emissions will increase, engine power will decrease, and fuel economy will drop. 90003 90008 4. Engine Surging or Hesitating 90009 90002 You may notice the engine hesitating while accelerating. In this case, the engine is not responding correctly to the driver. It may suddenly surge in power, then slow down. The engine is sucking in more air than it should be in its combustion process, causing the delay in power delivery.The combined hesitation and surging could indicate a spark plug problem. 90003 90008 5. Rough Idle 90009 90002 A bad spark plug may cause your engine to sound rough while idling. The vehicle-encompassing, jittery sound will also cause your vehicle to vibrate. It can indicate a spark plug problem in which a cylinder misfires only while idle. 90003 90008 6. Hard to Start 90009 90002 If you have trouble starting your vehicle, it could be a sign your spark plugs are worn. As noted above, the engine’s ignition system is comprised of multiple individual components that must work cohesively in order to function properly.At the first sign of problems starting your car, truck or SUV, it’s a good idea to contact a certified mechanic to take a look at the cause. 90003 90002 Regardless of what the issue might be, you might end up needing new spark plugs when yours eventually wear out. Being proactive about spark plug maintenance can extend the life of your engine by hundreds of thousands of miles. 90003 .90000 About Spark Plugs 90001 90002 The spark plugs are the business end of the ignition system. The spark plugs deliver the spark needed to ignite the air / fuel mixture. No spark means no combustion, wasted energy, increased emissions, loss of performance, idle roughness, hesitation, hard starting and possibly even a no start if all of the plugs are affected. 90003 90002 Consider for a moment what happens when a spark plug fires. The spark is created when high voltage supplied by the ignition coil jumps across a small air gap between the plug electrodes.The high voltage surge from the coil goes down the plug center electrode, ionizes the air between the electrodes (the air gap) and forms a spark (arc) as it jumps across the gap to the outer ground electrode. The initial voltage required to form the spark may range from 4,000 up to 28,000 volts depending on the distance between the electrodes, engine load and compression (larger distances, higher engine loads and compression all raise the firing voltage requirements). The spark only lasts about a millisecond, but it is long enough to start the burn.90003 90002 The instant at which the spark occurs is timed precisely to coincide with the position of the piston as it approaches top dead center on its compression stroke. On most engines, the spark occurs a few degrees before the piston reaches top dead center. If the spark occurs too soon (over advanced timing), cylinder pressures rise too quickly and peak too early in the cycle resulting in a loss of power. This can also cause engine damaging «detonation» (spark knock or ping) to occur.If the spark occurs too late, cylinder pressures peak too late in the cycle also resulting in a loss of power. Timing is controlled by the engine computer and ignition module, not the spark plugs, so a timing problem would indicate a sensor or module problem. 90003 90008 SPARK PLUG PROBLEMS 90009 90002 If an engine cranks but will not start, one of the first things you should check is spark. No spark at any of the plugs usually indicates an ignition problem that requires further investigation (a bad coil, ignition module, distributor pickup, crank sensor, etc.). 90003 90002 If the engine runs but misfires, one or more spark plugs may be worn or fouled, or there may be one or more bad spark plug wires. To diagnose this kind of problem, observe the firing pattern for each cylinder on an oscilloscope. A higher than normal firing voltage in any one cylinder may indicate excessive resistance in a plug wire, a loose plug wire, or a badly worn or misgapped spark plug (too wide). A lower than normal firing voltage in any one cylinder may indicate a shorted plug wire, or a fouled or damaged spark plug.90003 90014 90015 Carbon fouled spark plugs. 90016 90014 90002 Spark Plug Fouling is the number one reason why spark plugs have to be replaced. Plugs also have to be replaced for preventive maintenance because the electrodes wear as the plugs age. This increases the distance between the electrodes which in turn leads to a gradual increase in the firing voltage required to jump the gap. The gap on a standard spark plug grows about 0.00063 to 0.000126 inch for every 1,000 miles of normal driving, which means the firing voltage requirements creep up about 500 volts for every 10,000 to 15,000 miles of driving.Eventually the plugs firing voltage requirements under load exceed the ignition system output resulting in a misfire. But most plugs foul out long before they are worn out. 90003 90002 A single fouled spark plug is bad news because it can kill up to 25% of a four cylinder engines power output. It is like riding a horse with a broken leg. A fouled plug will also cause a big increase in fuel consumption and emissions (more than enough to cause an emissions failure and / or the check engine light to come on if the vehicle has an OBD-II system).90003 90002 Fouling can occur if fuel or oil deposits build upon the plug electrodes. The ceramic insulator around the center electrode prevents voltage from finding a shortcut to the steel plug shell and ground. Deposits here may form a conductive path for the voltage to bleed off to ground, preventing it from jumping the gap and making a spark. Deposits around the outer ground electrode or between the electrodes may form a barrier or bridge that also prevents a spark from occurring.90003 90002 Fouling can be a problem if an engine uses oil. Worn valve guide seals and guides can allow oil to be sucked down the guides and into the combustion chamber. A heavy buildup of thick black deposits on the plug and intake valve would indicate such a problem. Worn or broken rings, or damage to the cylinder wall can also allow oil to enter the combustion chamber and form ash deposits on the plugs. 90003 90002 Extensive idling and / or short trip stop and go driving can also lead to a rapid buildup of normal fuel deposits.This occurs because the plugs never get hot enough to burn off the deposits, something which plugs are designed to do. 90003 90002 Powdery black deposits on the plugs can occur from «carbon fouling.» The underlying cause here is a rich fuel mixture. On an older carbureted engine, the problem might be a broken or stuck choke. On a fuel injected engine, the problem might be a leaky injector, or a dead oxygen sensor or coolant sensor that prevents the engine control system from going into closed loop and leaning out the fuel mixture.90003 90008 Reading Spark Plugs 90009 Click on image at left to view Spark Plug Diagnosis Chart. Share 90002 Reading the condition of the old spark plugs can reveal a lot about what may have caused a plug to foul out as well as other problems that may be going on inside the engine, things like lean fuel mixture, rich fuel mixture, oil burning, overheating, overadvanced ignition timing, detonation / preignition and more. Replacing the spark plugs will not solve any of these problems, and the new spark plugs will likely suffer the same kind of fouling, wear or damage unless the underlying problem is diagnosed and repaired.90003 90008 SPARK PLUG HEAT RANGE 90009 90002 The «heat range» of a spark plug determines how hot the plug runs during normal operation. If the heat range is correctly matched to the engine application, the plug will run hot enough under normal driving conditions to burn off fouling deposits before they can cause problems. Likewise, the plug will not get too hot and become a source of ignition causing engine-damaging preignition and detonation. If the heat range is too cool for the application, though, fouling deposits may build up faster than they are burned off.90003 90002 For this reason, always follow the vehicle manufacturer or plug supplier heat range recommendations when selecting a spark plug for a particular application. Two spark plugs may appear to be identical on the outside but have entirely different heat ranges. 90003 90002 There are situations, though, that may require a slightly hotter or colder plug than the one normally recommended. Switching to a slightly hotter plug can help reduce fouling in an older engine that uses oil, for an engine that spends a lot of time idling or is used for short trip stop-and-go driving.But a hotter plug should not be used unless an engine is experiencing a fouling problem because of the increased risk of preignition and detonation. 90003 90002 For performance applications (racing, or engines that are run under heavier than normal loads or at high rpm for sustained periods of time), switching to a slightly colder plug can minimize the risk of preignition and detonation. Even so, a colder plug can increase the risk of fouling with extended idling and low speed operation.90003 90002 Many of today’s spark plugs have a very broad heat range because the plug manufacturer uses a copper core or platinum center electrode. Copper is an excellent conductor of heat, so the insulator can be designed to run hotter and burn off fouling deposits without it getting too hot under increased load to cause preignition or detonation. A solid platinum center electrode will also carry heat away from the tip, but not if the electrode only has a platinum tip. 90003 90008 SPARK PLUG REPLACEMENT OPTIONS 90009 90002 The recommended replacement interval for standard spark plugs has typically been every 30,000 to 45,000 miles.But most of extended life plugs have special wear-resistant electrodes made of platinum, iridium, nickel yttrium or other exotic alloys that minimize electrode erosion. Such plugs can usually go 100,000 miles plus with little or no electrode wear, and next generation spark plugs with ruthenium alloy electrodes can last up to 2X longer than iridium plugs. Even so, they may still be vulnerable to fouling if an engine has an oil consumption problem or spends excessive amounts of time idling. 90003 90002 Extended life spark plugs are a good upgrade for many engines, but may not be the best choice for an older engine that uses oil or even some performance engines.90003 90002 According to one plug manufacturer, platinum tipped electrodes run hotter than standard electrodes. This may increase the risk of preignition and detonation in some turbocharged and high performance engines. For such applications, a standard plug with a colder heat range, or iridium or ruthenium electrodes might be a safer choice. 90003 90002 There are also a wide variety of electrode configurations from which to choose today. Each manufacturer claims certain performance benefits for their particular design.It may be reduced electrode wear, or improved ignition reliability, or both. Small diameter fine wire iridium plugs, for example, concentrate the spark for easier ignitability and better flame propagation. Such plugs are often marketed as «premium» or «performance» plugs, and may command a price of up to $ 6 or $ 7 apiece. 90003 90002 Some long life spark plugs (as well as standard plugs) also have multiple electrodes (two, three or four ground electrodes). A spark plugs with more than one ground electrode will still only produce one spark per ignition cycle.But with four paths from which to choose, the likelihood of getting a good spark to at least one of the ground electrodes is multiplied for improved ignition reliability. Having more than one ground electrode also distributes the wear to minimize electrode erosion and growth of the spark gap over time. Some such plugs also experience a self-cleaning effect because the sideways path of the spark helps burn deposits off of the insulator. 90003 90002 Are premium plugs worth the extra money? They are if they can provide extended plug life, reduce the need for maintenance or improve overall ignition performance.The plugs in many front-wheel drive cars and minivans with V6 engines are very difficult to replace. Installing extended life plugs can almost eliminate the plug change hassle for good. Likewise, performance plugs that reduce misfires can enhance performance for a smoother running, cleaner more fuel efficient engine. No spark plug can create power out of thin air, but improved ignition reliability can minimize any horsepower loss due to misfire. 90003 90008 HOW TO CHANGE SPARK PLUGS 90009 90002 When changing spark plugs, wait until the engine has cooled to remove the plugs.The engine should be at or near room temperature, and not hot to the touch. This is very important with aluminum cylinder heads because it reduces the risk of damaging the threads in the cylinder heads when the plugs come out (aluminum is a much softer metal than cast iron). 90003 90002 Make sure the area around the spark plugs is clean and dry before you change the plugs. Use a vacuum or air hose to blow any debris away from the plug well in the cylinder head. 90003 90002 Use a long socket wrench (with extension and / or swivel if needed) and a 3/8 or 1/2-inch ratchet wrench to loosen and remove the spark plugs.DO NOT use an impact wrench or air ratchet to remove the plugs. Too much torque or unscrewing the plugs too rapidly could damage the spark plug holes in the cylinder head. 90003 If a plug binds or sticks and does not want to turn, DO NOT force it any further. Stop, apply some penetrating oil such ad WD-40 around the base of the spark plug, let it soak in a minute or two, then slowly screw the plug back in. Wait a few minutes for the solvent to loosen any carbon on the plug threads, then try to remove it again.You may have to repeat this process several times to remove a plug that has a lot of carbon on its threads. 90002 90069 TIP: 90070 If your engine has a distributor or a DIS ignition system with plug wires, change the spark plugs one at a time so you do not mix up the spark plug wires (very important to maintain the correct firing order!) . 90003 90002 When the new spark plugs are installed, go easy on the wrench. Most spark plugs require only about 7 to 15 lb. ft. for plugs with 14mm threads and 15 to 20 lb.ft. for plugs with 18mm threads. The plugs need to be tight enough so they do not work themselves loose and form a gas-tight seal, but not so tight that you risk damaging the threads in the cylinder head, or stripping or breaking a spark plug. 90003 90074 Engines with Aluminum Heads Require Special Spark Plugs 90075 90002 Most spark plugs for engines with aluminum heads have shells that are a nickel alloy, or the threads are nickel plated so the threads will not stick to the aluminum and damage the threads in the head the next time the plugs are changed.This is especially important with long life plugs that may not be changed for up to 100,000 miles, and long reach plugs that have a very long threaded nose. 90003 90002 DO NOT use spark plugs that have a black oxide coating on the shell or a plain steel shell in an engine with aluminum threads. Over time, these types of spark plugs tend to stick to the aluminum and will likely be very difficult to remove the next time the plugs are changed, or they may damage the threads in the cylinder head when they come out.90003 90002 Black oxide coated spark plugs or ones with plain steel uncoated shells should only be used in engines with cast iron cylinder heads. These types of spark plugs can rust or corrode making removal difficult (especially after a LOT of miles). We would recommend upgrading to a nickel alloy or nickel plated spark plug, or applying a SMALL drop of anti-seize to the plug threads to prevent sticking. 90003 90002 90069 NOTE: 90070 Anti-seize will reduce thread friction, so apply only a SMALL amount to the threads, and be careful not to get any anti-seize on the electrode shell or electrodes.Use about 20 percent LESS torque when tightening the plugs. Over-tightening the spark plugs may strip the threads in the cylinder head or even break the spark plug! 90003 90014 90087 90002 Watch Out for Ford Motorcraft Two-piece Spark Plugs That Break! 90003 90002 The original equipment Motorcraft brand spark plugs that were factory installed in many late model (2004 to 2008) Ford trucks with 5.4L V8 and 6.8L V10 engines, 2005 to 2007 Mustang GT 4.6 & 5.4L V8 engines, and 2008 Mustang GT models built prior to 11/30/07) can break when you attempt to remove them! The spark plugs have a crimped lower electrode shell that becomes coated with carbon, causing it to stick in the cylinder head.When you attempt to unscrew the plug, the lower shell breaks off and stays in the head. Removing the broken shell requires a special Ford, Snap-On or Lisle extractor tool. Worse yet, if any shell or electrode fragments fall into the cylinder and can not be fished out, you may have to remove the cylinder head to get the debris out. Many experts recommend replacing the original equipment Motorcraft spark plugs before the get too many miles on them (over 35,000). Replacing the plugs at low mileage will reduce the risk of them sticking and breaking.Waiting until the original equipment spark plugs have 100,000 miles on them is asking for trouble! 90003 90002 Ford Technical Service Bulletin 08-7-6 covers the recommended removal procedure for these spark plugs, as well as the repair procedure if one or more plugs break (Click Here to View Ford TSB 08-7-6). Essentially, it says to remove the spark plugs when the engine is COLD (room temperature). Loosen the plugs about 1/8 to 1/4 turn, stop and spray some WD-40 or penetrating oil into the spark plug well.Allow the oil to soak into the threads so it can loosen the carbon around the electrode shell. Wait at least 15 minutes, or longer (overnight is recommended if the plugs have over 80,000 miles on them). Then slowly loosen the plugs, applying no more than 35 ft. lbs of torque to your wrench. If a plug sticks, retighten it half a turn, apply more penetrating oil, wait, then try again. 90003 90002 Do NOT reinstall the same Motorcraft spark plugs (PZT 2FE Platinum). Replace them with a much improved one-piece spark plug from Champion (7989), or a similar spark plug from NGK, Denso or Bosch.Apply nickel anti-seize to the outer surface of the lower electrode shell (the smooth part) before installing the plugs. 90003 90002 For more information about the Ford spark plug breakage problem Click Here. 90003 90074 TIGHTENING SPARK PLUGS: BE CAREFUL! 90075 90002 How much the spark plugs should be tightened depends on the size of the plugs and the type of plug seat. Spark plugs with gasket style seats require more torque than those with taper seats. 90003 90087 90002 Always follow the vehicle manufacturer torque recommendations, but as a general rule 14 mm plugs with a gasket style seat in older engiens with cast iron heads should be tightened to 26 to 30 ft.lbs. but only 18 to 22 ft.lbs. in aluminum heads. Likewise, 18 mm plugs with gasket style seats should be tightened to 32 to 38 ft.lbs. in cast iron heads but only 28 to 34 ft.lbs. in aluminum heads. For taper seat spark plugs in most late model engines, 14 mm plugs should be tightened to 7 to 15 ft.lbs. in both cast iron and aluminum, while 18 mm taper seat plugs should be tightened to 15 to 20 ft.lbs. in both types of heads. 90003 90002 If you are not sure how much to tighten the spark plugs, look up the specifications online or in a service manual.90003 90014 90008 HOW TO ADJUST SPARK PLUG GAP 90009 90002 As for setting the plug gap, always follow the vehicle manufacturer recommendations. Spark plug gaps typically range from .028 inches up to .034 inches or even larger. One exception here is Bosch Platinum + 4 or Platinum + 2 spark plugs. These plugs are pregapped at the factory to a standard 1.6 mm gap and should NOT be altered regardless of what the vehicle manufacturer specifies for the engine. Bosch says this is necessary to achieve maximum plug performance and longevity, so do not change the gap.90003 90002 Finally, play close attention to the condition of the spark plug cables and boots when changing the plugs. Loose fitting boots or damaged cables can cause ignition misfire. If your engine has a coil-on-plug ignition system, replacing the rubber boot that fits between the coil and spark plug is recommended when changing high mileage spark plugs. This will prevent arcing that can cause misfires. On engines with a distributor or a DIS coil pack, make sure the spark plug wires are properly routed to the correct cylinders (look up the firing order if it is not marked on the cabled).Plug wires must also be supported in their looms to avoid crossfire problems and contact with the hot exhaust manifold. 90003 90014 90115 90014 90074 90118 More Spark Plug & Ignition Articles: 90075 Spark Plug Technology 90002 Ruthenium Spark Plugs 90003 90002 Why Spark Plugs Still Need To Be Replaced 90003 90002 Spark Plug Fouling 90003 90002 Original Equipment Spark Plugs, Are They Best? 90003 90002 Do not Use Ordinary Spark Plugs with Waste Spark DIS Ignition Systems 90003 90002 Bosch Platinum +4 Spark Plugs 90003 90002 Spark Plug Wires 90003 90002 Analyzing Ignition Misfires 90003 90002 Spark Plugs & Ignition Performance 90003 90002 Distributor Ignition Systems 90003 90002 Distributorless Ignition Systems 90003 90002 Coil-Over-Plug Ignition Systems 90003 90002 Ignition Coil Diagnosis & Testing 90003 90002 Engine Will not Start, No Spark 90003 90002 Diagnosing An Engine that Will not Crank or Start 90003 90002 90151 Click Here to See More Carley Automotive Technical Articles 90003 .90000 Everything You Need to Know About Spark Plugs 90001 90002 What do spark plugs do? 90003 90004 90005 Think of spark plugs as the tiniest bolt of lighting. Small but mighty, the spark of electricity that the plug emits across a small gap creates the ignition for the combustion needed to start your car. By putting the engine’s pistons in motion, your car can power up, stay powered up and produce a smooth burn of the compressed air-fuel mixture. Mind you, spark plugs like it hot: they withstand extreme heat and pressure within your cylinders and are built to burn off deposits from fuel additives or other contaminants.90006 90004 What does it mean for you? 90006 90004 Well, without a spark, your car will not start-or go anywhere. And because spark plug health is directly linked to engine performance, it stands to reason weak or bad spark plugs lead to problems, be it issues with cold-starting or misfires during acceleration. Besides-without healthy ones-your ride can not sustain maximum power, and your vehicle can see a drop in fuel economy. Now, nobody wants that. 90006 90011 90012 90002 What spark plugs do you install? 90003 90004 We install a range of high-quality, quick-starting Bosch spark plugs, so you can get where you need to go-without delay.90006 90004 90018 Bosch Platinum Plus spark plugs 90019: Made with durable, efficient platinum, these plugs maximize MPGs. Adding appeal, they can perform 25% longer than previous Bosch Platinum spark plug. 90006 90004 90018 Bosch Iridium spark plugs 90019: The next generation high-performing plugs, these up the ante on durability, ignite faster and last up to four times longer than their distant copper cousins. Better, more reliable power and acceleration, as well as enhanced throttle response, are things you can take to the bank.90006 90004 It’s no wonder that professional motor sports, like the Indy 500 ™ *, have come to rely on the superior quality and sophisticated manufacturing of Bosch spark plugs, too. In fact, the last 17 Indy 500 winners all crossed the finish line with Bosch spark plugs intact. Now that’s quite the track record. 90006 90004 90028 * Indy 500 is a registered trademark of Brickyard Trademarks, Inc. Used with Permission. 90029 90006 90004 Learn more about the Bosch spark plugs we carry for your ride.90006 90002 How often should spark plugs be replaced on my vehicle? 90003 90004 Luckily, spark plugs do not require replacement very often and can go years and many miles before replacement is a must. 90006 90004 Most auto manufacturers suggest having new spark plugs installed about every 30,000 miles; however, spark plug longevity depends on the condition and type of spark plug. Copper plugs, for example, have the shortest life, while plugs made of more advanced and durable materials can provide up to four times the life of a copper spark plug.90006 90004 Learn more about the Bosch spark plugs we carry for your ride. 90006 90002 What happens to a spark plug as it ages? 90003 90004 By the time spark plugs reach old age, they’ve spent thousands of miles enduring abuse and withstanding the most extreme temperatures and conditions to stay intact. That’s where the importance of spark plug material comes into play. The stronger the material, the more durable and long-lasting the spark plug. Naturally, though, every spark plug undergoes wear and tear, materials aside.90006 90004 Spark plugs can not last forever, and here’s why: 90006 90004 90018 Spark plug deposit buildup 90019: When deposits form on spark plugs from interaction with the air-fuel mixture, it can lead to pre-ignition of the fuel. That means a jerky and unreliable supply of energy for your car. 90006 90004 90018 Expanding, harder-to-jump gap 90019: When a spark plug ignites, it has to travel across a gap of space in order provide the right level of combustion at the right moment. As spark plugs age, this gap widens as a result of extreme temperatures, debris and normal wear and tear.If the gap is too far apart, combustion will be erratic or ineffective. 90006 90004 We have the right Bosch spark plug to provide just the right spark. Schedule an appointment. 90006 90002 What is the benefit of replacing a spark plug? 90003 90004 The primary benefit is knowing your car will start without a hitch. Needless to say, that’s not all that matters. New spark plugs provide a lot of other performance benefits as well. 90006 90004 New Bosch spark plugs will lead to: 90006 90063 90064 90018 Consistent production of optimal combustion.90019 Fully functioning spark plugs equate a fully functioning combustion system. Get this operating successfully, and a lot of performance issues you’re experiencing could be a distant memory. 90067 90064 90018 Better fuel economy. 90019 The National Institute for Automotive Service Excellence says misfiring spark plugs can reduce fuel efficiency by 30%. New plugs, when replaced at specified intervals, maximize fuel economy and save some dough. 90067 90064 90018 Smooth and energetic starts.90019 The first time you turn the ignition with a new spark plug can be a eye-opening experience. That old spark plug may have been the reason your car was experiencing those jerky starts. 90067 90064 90018 Less harmful emissions. 90019 The Environmental Protection Agency states that regular engine tune-ups-especially in regard to spark plugs-not only save gas but also reduce air pollution. That’s a win-win. 90067 90080 90004 Bosch spark plugs are engineered to last. 90006 90004 Schedule a spark plug replacement, inspection or tune-up today.90006 90002 How involved is spark plug replacement service? 90003 90004 The complexity of a spark plug exchange varies from straightforward to very involved. Your vehicle must be worked on when the parts are cold, and the amount of time it takes to complete the service varies by make and model. In some cases, it may be necessary to disassemble vehicle parts in order to reach your spark plugs. Plan ahead, because a vehicle drop-off is usually required. 90006 90002 What symptoms may indicate my vehicle’s spark plugs need replacing? 90003 90004 90018 The signs of worn spark plugs.Hear it. Feel it. Sense it. 90019 90006 90063 90064 90018 Rattling, pinging or «knock» -like noises. 90019 When spark plugs begin to misfire, you may notice unusual noises from the force of the pistons and combustion not working properly. Pistons travel at high velocities. If the spark plug fires at the wrong time, this could lead to constant rattling, pinging or knocking sounds. 90067 90064 90018 Hard vehicle start. 90019 If your car is having trouble starting or just feels disjointed and jerky, your spark plugs may not be working right, and this can lead to misfires and erratic performance.90067 90064 90018 Reduced performance. 90019 When you’re out cruising, your spark plugs fire when you accelerate and change gears. If the spark that this little plug generates is not functioning at 100 percent, your vehicle performance will be poor, and you’ll experience a sluggish and fuel-wasting drive. 90067 90064 90018 Poor fuel economy. 90019 Lots of things can lead to poor fuel economy, though when it comes to old spark plugs, you’ll find fuel is wasted since your vehicle fails to receive the proper, heat-generating spark at the right time.90067 90080 90004 If you’ve spotted any of these symptoms, we suggest having your vehicle inspected in order to prevent further problems. Healthy spark plugs are vital to your car’s ability to start up and remain powered. 90006 90004 Get your car back to peak performance with Bosch spark plugs. Schedule an appointment today. 90006 90002 Does Firestone Complete Auto Care carry spark plugs that meet my vehicle’s specifications? 90003 90004 Meets or exceeds, my friend. Meets or exceeds. That’s the mantra around here.That’s why we only install Bosch brand spark plugs. For over 100 years, Bosch has been a leader and innovator in spark plug technology. Consider this: Bosch was making car parts before Henry Ford ever unveiled the first Model T. They’ve also been the spark plug found in the last 17 Indy 500 winners *. 90006 90004 90028 * Indy 500 is a registered trademark of Brickyard Trademarks, Inc. Used with Permission. 90029 90006 90004 Make an appointment to get your spark plugs checked out at your Firestone Complete Auto Care.90006 90002 Can not I just get a tune-up, like the old days? 90003 90004 Back in the day, a tune-up meant replacing spark plugs, spark plug wires, the distributor, distributor cap, rotor and points and condenser in addition to setting the timer and adjusting the carburetor. Nowadays, though, your car’s computer does most of the heavy lifting, leaving you to worry most about the spark plugs and fuel injector, sensors and switches. 90006 90004 It’s important to note the modern «standard» tuneup, today, means changing your spark plugs.90006 90004 90018 Our standard tune-up includes: 90019 90006 90063 90064 90018 Visual inspection 90019 of your engine components 90067 90064 90018 Installation 90019 of Bosch spark plugs 90067 90064 90018 Timing and idle set 90019 (if necessary, though most of today’s vehicles have computer systems adjust these automatically) 90067 90064 90018 Supply 12 month / 12,000 90019 mile limited warranty * 90067 90080 90004 90028 * See an auto advisor for complete terms and conditions of written, limited warranties.90029 90006 90004 Schedule a spark plug replacement or a standard tune-up service today. 90006 90004 90018 Good to know: 90019 Bosch spark plug technology is made to meet or exceed original manufacturer specs with powerful sparking technology and a longer lifespan than its copper-core competitors. If your vehicle needs new spark plugs, we have the Bosch plug designed for your ride. 90006 90004 Get the best spark. Every time. Have Bosch spark plugs installed today. 90006.90000 How to Replace Spark Plugs in Volkswagen Cars 90001 90002 90003 by Contributing WriterUpdated June 12 2017 90004 90005 90002 Changing your own spark plugs can really improve your vehicle’s performance, as well as increase your understanding of your car’s operation and save you some money. Since Volkswagen car owners are notorious for going above and beyond to keep their cars drivable long after other owners would have consigned them to the junkyard, changing the spark plugs can be a great way for the new Volkswagen car handyman to begin to become familiar with the mechanics involved in a Volkswagen car and keep their car running smoothly.90005 90008 90002 Under The Hood: 90005 90008 90002 How to Replace Spark Plugs in a VW Passat 90005 90008 90002 Let the engine get cool to the point that you can touch it. Disconnect the negative battery cable form the battery. 90005 90008 90002 Remove the plastic dust cover from the Passat engine. Locate the spark plug wires along the sides of the engine. There are six spark plugs in the V6 engine, three on each side. 90005 90008 90002 Grab the spark plug wire and turn it one-half turn to the right and then 1/2 turn to the left to unlock the wire’s boot.Pull back to remove the boot. 90005 90008 90002 Use the spark plug socket, wrench and extension to unscrew the old spark plug and remove it from the well. 90005 90008 90002 Apply anti-seize lubricant to the threads of the new spark plug. 90005 90008 90002 Screw the spark plug into the cylinder well by hand. Test the tension and adjust it to 22 ft-lbs. by tightening or loosening the plug. The wrong tension may cause damage to the engine. 90005 90008 90002 Reattach the spark plug wire. Repeat Steps 1 through 7 for the remainder of the spark plugs.Place the dust cover back on the engine and screw it into place. 90005 90008 90002 How to Replace Spark Plugs in a VW Beetle 90005 90008 90002 Turn off the car and allow the engine to cool for 30 minutes. Pop the hood and locate the spark plug wires. If the Beetle model’s engine is 1.8 liters, the spark plugs are located on the top of the engine. For 2.0 liter engines, the spark plug wires are under the engine cover. 90005 90008 90002 Loosen the screws on the side of the engine that hold the engine cover.Remove the cover. Disconnect the fuel injectors on the 2.0 liter engine. For a 1.8 liter engine, unscrew the vacuum reservoir and place it to the side. 90005 90008 90002 Turn the spark plug wire from side to side to unlock the wire. Pull the wire by the boot or cover on the end of the spark plug. Replace each spark plug completely before moving to the next one to keep the spark plug wires from crossing. 90005 90008 90002 Unscrew the spark plug with the socket and wrench. Pull the spark plug out of the engine block.90005 90008 90002 Blow or brush out any debris in the spark plug wire or in the cylinder well. This extends the life of the spark plug. 90005 90008 90002 Apply silicon lubricant to the spark plug threads and to the inside of the boot. 90005 90008 90002 Insert the spark plug into the engine block and tighten it by hand. Test the tension of the spark plug. Most spark plugs for a VW Beetle require a tension between 15 and 22 foot pounds. Consult the package to determine the correct tension needed.Different spark plug manufactures require different tensions. 90005 90008 90002 Reconnect the spark plug cable and turn it in either direction to lock it in place. 90005 90008 90002 Repeat Steps 2 through 8 for the remaining spark plugs. Replace the vacuum reservoir or the fuel injectors. Place the cover on the engine and secure it in place. 90005 90008 90002 How to Replace the Spark Plugs on a Beetle 90005 90008 90002 Locate your spark plugs. If you are unfamiliar with the layout of your Volkswagen Beetle’s engine, refer to your owner’s manual for a diagram of the engine and the spark plugs.If you do not have a manual, locate your spark plugs by finding the distributor cap on the rear of the engine, which will have four large wires leading from it. Trace these four wires outward, where they will connect to the four spark plugs in your vehicle. 90005 90008 90002 Grab the end of the spark plug wire where it meets the spark plug. Pull in a straight vertical motion away from the engine, rather than at an angle. Be sure to pull on the end of the wire, rather than on the wire itself. This should expose the hole which contains the spark plug.90005 90008 90002 Attach the 5 / 8th inch socket or spark plug socket to the socket wrench, and lower it into the hole until it fits snugly around the spark plug. Rotate the socket wrench counter-clockwise until the spark plug comes free and can be withdrawn. Be careful not to hit the spark plug against the inside of the hole, or to strip the spark plug with the socket wrench. 90005 90008 90002 Smear a small amount of anti-seize compound around the threads of the new spark plug. Insert the new spark plug into the spark plug socket, and lower it into the hole.Rotate the socket wrench clockwise until the spark plug tightens, then rotate an additional 1/8 of a turn to properly adjust the torque. 90005 90008 90002 How to Replace Spark Plugs in a VW Jetta 90005 90008 90002 Park the VW Jetta in a shady area and allow the engine to cool. Pop the hood to help the engine cool faster. 90005 90008 90002 Remove the plastic dust cover from the Jetta engine. Locate the ignition coils that run across the top of the engine. 90005 90008 90002 Use the ignition coil puller to remove one of the coils.Pull the coil up and out of the engine to reveal the spark plug. Complete the replacement of each spark plug before starting the next. 90005 90008 90002 Loosen and remove the old spark plug from the cylinder well. 90005 90008 90002 Apply anti-seize compound to the threads of the new spark plug and slide it into the cylinder well. The compound helps keep the spark plug from adhering to the cylinder well. 90005 90008 90002 Tighten the spark plug to a tension of 15 ft-lbs. Use the tension tester tool to make sure the tension is adjusted to the required amount.90005 90008 90002 Replace the ignition coil and turn it to lock into place. 90005 90008 90002 Repeat Steps 3 through 7 for the remaining spark plugs. Place the plastic dust cover back on the Jetta’s engine and screw it into place. 90005.